How to Return Qualtrics Quiz Grades to your MOOC
10 Jul 2017You are teaching a MOOC or using a more traditional virtual learning environment (VLE)? You want to enhance your course with external exercises and quizzes? And you want the external tool to return the students’ grades to your MOOC/VLE? Here, I’ll show you how to do it.
1. The Qualtrics LTI bridge
Qualtrics survey software will enable you to create enhanced questionnaires and quizzes. In order to return the grade from a Qualtrics quiz to the MOOC or VLE of your choice, you’ll first need to make sure to setup the Qualtrics LTI bridge. The following resources will introduce you to the tool and help you set it up:
- A demonstration of the bridge, without grade returns. Settings for a demonstration with grade returns are provided below.
- Detailed instructions on setting up the bridge.
- The paper about the bridge.
2. Grading
Now that you’ve got the bridge in place, it’s time to make sure grades can be sent from Qualtrics to your MOOC. You have two options. Either you assign a fixed grade, for instance to simply see whether a student finished a quiz or questionnaire, or you assign a variable grade, for instance to reflect the proportion correct answers.
Fixed grades
You might just want to know whether a student finished the quiz or questionnaire, without the need to assign a variable grade. You can do this by following the instructions on setting up the tool provider. By setting custom_grade=1, Qualtrics will return a 1 (or 100%) whenever a student finishes the questionnaire or quiz. You can set this value to any value in the range of 0.00 to 1.00 (which corresponds to 0% to 100% correct).
Variable grades
However, in a quiz setting, you’re most likely interested in the proportion correct. Such a variable grade is a little more tricky, but Qualtrics does provide the means to return such a grade:
- Make sure you understand scoring in Qualtrics.
- Set up scoring for your Qualtrics quiz.
- Make sure you understand math operations and embedded data fields in Qualtrics (follow the link and check the links under More Information).
Now that you’ve set up scoring and know about math operations and embedded data, it’s time to use this knowledge to create variable grades:
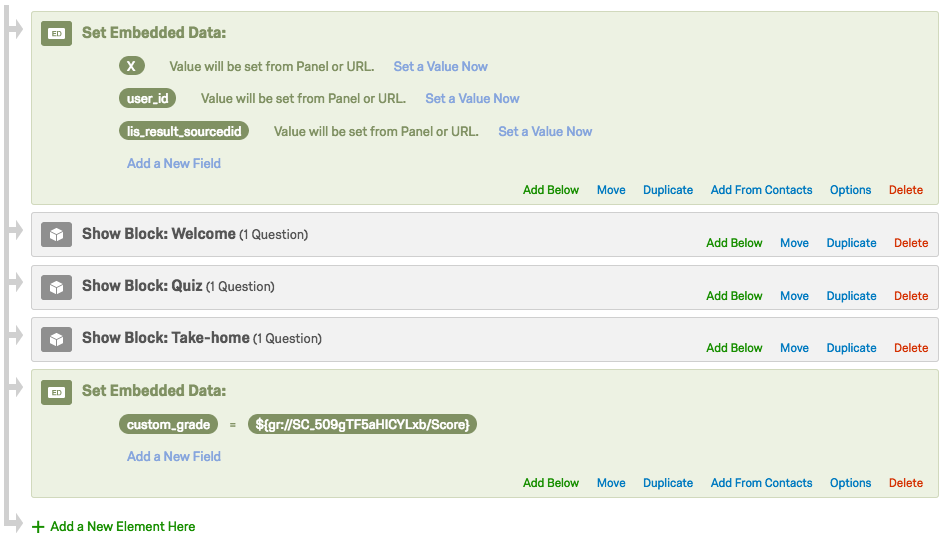
- Go to the Survey Flow of your quiz.
- If you’ve set up the Qualtrics bridge correctly, you already have a
Set Embedded Dataelement. - Create another
Set Embedded Dataelement at the end of the Survey Flow. - In this element, add a new field and name it
custom_grade. - You can now create your own formula to calculate the grade for a student. Importantly, make sure the grade cannot exceed the range of
0.00to1.00.
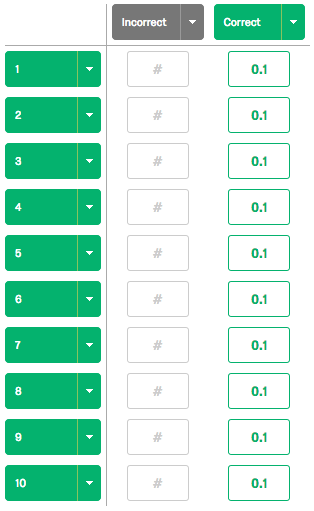
In the simplest case you can have 10 items, where each correct answer is scored with a 0.1. If you let custom_grade be the score, the grade will automatically reflect the proportion correct.


Now that you have a variable grade, it’s time to make sure you can return it to your MOOC or VLE:
- Add another new field (this time, the name you give it is irrelevant).
- Set a value for that field, select Insert Piped Text > Embedded Data Field, and insert
custom_grade. - Copy the piped text that just appeared as the new value, most likely
${e://Field/custom_grade}. - You can remove the field with the irrelevant name if you wish, since it won’t be used anymore.
The piped text carries the variable grade and is used by the Qualtrics LTI tool to return it to the MOOC:
- Go to the Survey Options of your quiz and find the Survey Termination Redirect URL.
- If you’ve set up the Qualtrics bridge correctly, this redirect URL has the value of
1attached to thecustom_gradeparameter (see instructions on setting up the tool provider). - Replace the
1with the piped text, which will most likely result in[URL]&custom_grade=${e://Field/custom_grade}.
3. Returning grades
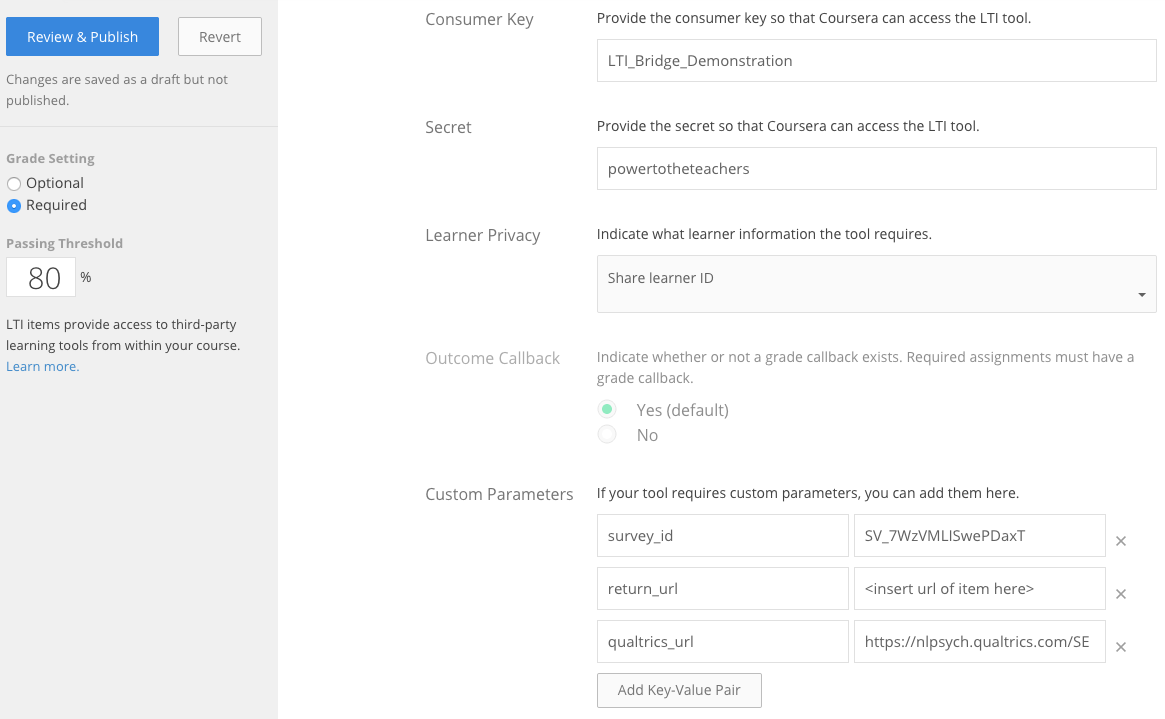
Of course, you’ll want your MOOC to collect this grade. You can do this by following the instructions on setting up the tool consumer. That is, simply make sure you enable grading callbacks when setting up the LTI item in your MOOC, and optionally, set the return URL.
4. A demonstration
Use the instructions from the demonstration post and the settings from the image below.

Happy grading!